Javascript Upload File From Client to Server
If you lot allow users to upload image files, you volition have to manage storage and ensure that the upload endpoints are not a security risk for your awarding.
To simplify this, you can use a costless epitome management tool like ImageKit.io, which offers image upload and real-time epitome resizing features.
Past the end of this post, you will have a working file upload demo application and a solid understanding of how to use this in your existing project. The sample project source code is hosted on Github.
imagekitio/client-side-file-upload-plain
Customer-side file upload using apparently Javascript. Contribute to imagekitio/client-side-file-upload-evidently development past creating an business relationship on GitHub.
Let's go started.
Create an account on ImageKit
In case you haven't already registered, create a gratuitous account on ImageKit. This forever complimentary programme has generous storage limits, which is good enough for many small and medium scale web applications.
File upload process
ImageKit upload API is secure. To use information technology, you lot will need some authentication. Authenticating using a secret private key is straightforward when uploading files from a secure location such as your backend application. Withal, when uploading files directly from the customer-side, the authentication has to exist washed by providing a signature, which tin simply be generated using your account'south private key.
Before we write code, allow'southward understand all the steps:
- Your users volition upload the file on the client-side (browser).
- The client-side application will fetch a signature from your backend. The backend volition generate this signature using your account'south private central. The signature should never exist generated on the client-side.
- The customer-side application volition call ImageKit upload API with actual file content, signature, and other file upload options.
- The upload API responds with a successful response. The client-side application tin push this response on the backend.
Then overall, your frontend application triggers the actual upload while your backend is responsible for generating the signature. The ImageKit handles the actual upload.
Using SDKs to simplify upload & signature generation ?
Nosotros will be using the ImageKit Javascript SDK on the client-side. It provides an easy to apply wrapper around upload API. Since we demand to generate a signature, we will utilize the ImageKit Node.js SDK on the server-side.
Client-side code
Create a file alphabetize.html
<form action="#" onsubmit="upload(event)"> <input type="file" id="file" /> <input type="submit" /> </form> Let's include the ImageKit Javascript SDK.
<form action="#" onsubmit="upload(event)"> <input type="file" id="file" /> <input type="submit" /> </class> <script blazon="text/javascript" src="https://unpkg.com/imagekit-javascript/dist/imagekit.min.js"></script> Allow'south implement the upload function. Here nosotros will initialize the Javascript SDK and will be needing urlEndpoint, publicKey and authenticationEndpoint parameters.
Copy urlEndpoint and publicKey the developer section in your ImageKit dashboard - https://imagekit.io/dashboard#developers
Nosotros will implement authenticationEndpoint on the backend. The SDK internally makes an HTTP GET request to this endpoint and expects a JSON response with 3 fields, i.e. signature, token, and expire.
/* SDK initialization authenticationEndpoint is implemented in backedn i.east. server.js file */ var imagekit = new ImageKit({ publicKey: "your_public_key", urlEndpoint: "your_url_endpoint", // https://ik.imagekit.io/your_imagekit_id authenticationEndpoint: "http://localhost:3000/signature" }); // Upload role internally uses the ImageKit.io javascript SDK function upload(e) { e.preventDefault(); var file = document.getElementById("file"); imagekit.upload({ file: file.files[0], fileName: file.files[0].name || "sample-file.jpg", tags: ["tag1"], // Comma seperated value of tags responseFields: "tags" // Comma seperated values of fields you want in response due east.grand. tags, isPrivateFile etc }, part (err, effect) { if (err) { alert("Error in file upload. Check console logs for error response"); console.log(err); } else { alert("File uploaded. Check console logs for success response"); console.log(event); } }) } Server-side code
We are using Node.js to create a simple HTTP server for this demo backend and implement our authentication endpoint. However, you can use any language and leverage ImageKit's server-side SDKs to generate authentication parameters required for client-side file upload.
Create a file server.js. Nosotros will employ the Express framework and ImageKit Node.js SDK.
const express = require('express') const ImageKit = require("imagekit"); const app = express(); var imagekit = new ImageKit({ publicKey: "your_public_key", privateKey: "your_private_key", urlEndpoint: "https://ik.imagekit.io/your_imagekit_id" }); app.get('/signature', (req, res) => { var authentcationParameters = imagekit.getAuthenticationParameters(); res.ship(authentcationParameters); }) app.mind(3000, () => { panel.log("Sample backend app listening at http://localhost:3000"); }) To initialize the ImageKit Node.js SDK, we will need publicKey, privateKey and urlEndpoint. Y'all can become these parameters from the developer section in your ImageKit dashboard - https://imagekit.io/dashboard#developers.
The Private API Cardinal should never be exposed in whatever client-side code.
Let's edit server.js to serve the index.html file we created on the root path i.east. /
const express = require('express') const ImageKit = require("imagekit"); const fs = require('fs') const app = express(); var imagekit = new ImageKit({ publicKey: "your_public_key", privateKey: "your_private_key", urlEndpoint: "https://ik.imagekit.io/your_imagekit_id" }); app.get('/signature', (req, res) => { var authentcationParameters = imagekit.getAuthenticationParameters(); res.ship(authentcationParameters); }) app.get('/', (req, res) => { res.writeHead(200, { 'content-type': 'text/html' }); fs.createReadStream('alphabetize.html').pipe(res); }); app.listen(3000, () => { panel.log("Sample backend app listening at http://localhost:3000"); }) Now run the backend server
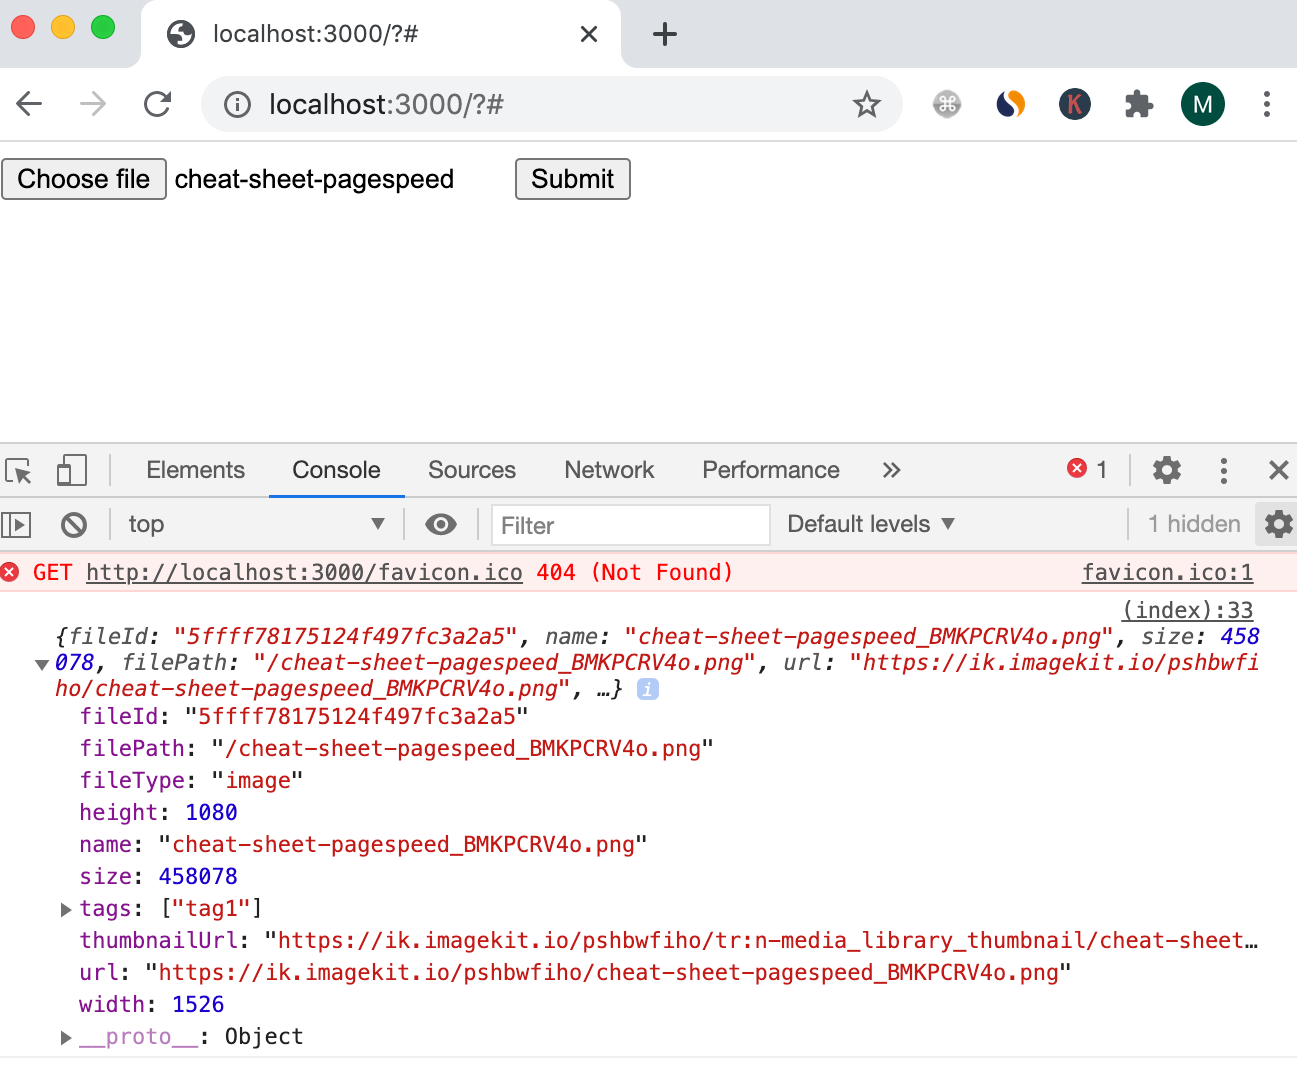
node server.js This will run an HTTP server on port 3000. Open http://localhost:3000 in your browser. Choose a file and upload it. Open the console to see the response object in logs like this:
Summary
If you demand to implement file uploading in your awarding and you don't desire to manage storage, security, or handle actual uploading, start using ImageKit today for free. The upload API is simple to utilize, equally we learned in this blog mail. If yous come up beyond any problem while implementing this, achieve out to our support team at support@imagekit.io. We volition be happy to help you!
Source: https://imagekit.io/blog/client-side-file-upload/
0 Response to "Javascript Upload File From Client to Server"
Post a Comment